|
| Visual Studio Code Setup Instruction |
Setting up Visual Studio Code (VS Code) for C and C++ programming is a great way to write, compile, and debug your code efficiently on Windows or Mac. This comprehensive guide will walk you through each step, ensuring you have all the tools and extensions needed for a smooth programming experience. Whether you are a beginner or an experienced developer, follow these instructions to get started quickly.
Step 1: Download and Install Visual Studio Code
First, download the latest version of Visual Studio Code from the official website. Choose the correct version for your operating system (Windows, Mac, or Linux), then follow the on-screen instructions to complete the installation.

|
| Download VS Code |
For best performance, it is recommended to choose the 64-bit version if your system supports it.
Step 2: Install Essential Extensions in VS Code
After installing VS Code, open the editor. To enable C and C++ programming, you need to install a few important extensions.
Install the C/C++ Extension:
Click the Extensions icon on the left sidebar (it looks like four squares), then search for "C/C++". Install the extension published by Microsoft to enable C and C++ language support.
|
|
| Extension Icon in VS Code |
Once installed, reload VS Code to activate the extension.
Install the Code Runner Extension:
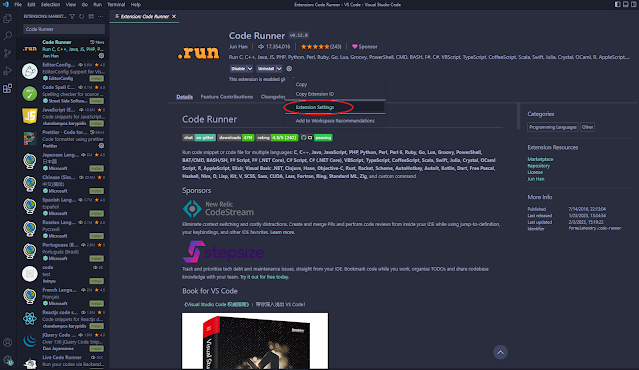
Code Runner allows you to quickly run C/C++ code inside VS Code. Search for "Code Runner" in the Extensions panel and install it.

|
| Code Runner Extension Setting |
After installation, go to the "Extension Setting" for Code Runner.

|
| Code Runner Terminal Setting |
Scroll down and look for the "Code-runner: Run In Terminal" option, or simply search by
@ext:formulahendry.code-runnerStep 3: Install GCC Compiler (MinGW) for Windows
To compile and run C and C++ programs, you need a compiler. GCC (GNU Compiler Collection) is a popular and free compiler. On Windows, you can use MinGW.
Download MinGW and run the installer as Administrator. Follow the installation steps, leaving the default path as C:\MinGW.

|
| Step-1: MinGW Installation Screen |
Click the Install button and follow the prompts. Do not change the installation path.
.webp)
|
| Step-2: MinGW Installation Path |
Once installation is complete, select all the packages you need and click Installation > Apply Changes. This may take a few minutes.
.webp)
|
| Step-4: MinGW Package Installation |
Step 4: Set Up Environment Variables
To use the GCC compiler from any directory, you need to add it to your system's PATH environment variable.
Right-click This PC or My Computer, select Properties, then go to Advanced system settings and click Environment Variables. Under "System variables", find and select Path, then click Edit and add C:\MinGW\bin to the list. Click OK to save.
Final Steps: Test Your Setup
Open Visual Studio Code and create a new C or C++ file. Write a simple program and use the Code Runner extension to compile and run it. If everything is set up correctly, you should see the output in the terminal. If you encounter errors, double-check your compiler installation and environment variable settings.
Conclusion
By following these steps, you can set up Visual Studio Code for C and C++ programming on Windows or Mac. This setup gives you a powerful, flexible, and modern development environment. Remember to keep your extensions and compiler updated for the best experience.
For more tips, troubleshooting, and advanced configurations, visit the official VS Code C++ documentation.
